The best survival shelters and how to build them
If you ever find yourself in a survival situation in the wilderness, the first thing you need to do is protect yourself. Therefore, knowing how to build a survival shelter that will keep your protected and safe is a very important life skill. While the temporary home can be time-consuming to set up, it’s well worth the effort.
Most people think that building a survival shelter is hard and impossible. But, the reality is that the process is much easier than you might think. In this article, we will introduce some key principles of building a survival shelter, and the different types of shelters you can make.

Fundamental principles
Location

One of the most important principles of building the shelter is the location. It needs to be constructed in a location that has enough access to many materials and resources. Also, it needs to be away from any hazard that can threaten your shelter and your life. It’s also crucial to construct the shelter in a flat location, if possible. This way you will be more comfortable in it.
Structure and size

Many people make a huge mistake when building their shelters too big. Large survival shelters are more time-consuming to make, and they have more space inside, which makes them colder. You want to keep the heat inside the shelter, so the best kind of survival shelters are the small ones. The structure is a huge safety concern as well. Shelters made out of thin branches are easier to fall apart, and won’t support your weight if you’re supporting yourself off the ground.
Insulation

Insulation is very important as well, and it doesn’t matter whether you’re surviving in a cold or hot weather. You need a good insulation to retain as much heat as possible and protect yourself from the outside elements. Luckily, there are plenty of different natural materials available in the wilderness to complete this task. Grass, leaves, ferns, soil, bark, pine needles, are only a few examples that will help you get a good insulation.
Heat

In cold environments, the shelter needs to keep you warm and serve as a defense against hypothermia. That’s why is crucial that your survival shelter is smaller and well insulated. It needs to retain the heat, but also to be capable of being warmed by a fire without burning the shelter down. If the fireplace is inside the shelter, it needs to be small, so that the walls and the roof of the shelter don’t’s catch a flame. Make sue you have enough firewood standby, so you can keep the fire going all the time.

Those were some of the main principles of building a survival shelter that you should follow. Now, take a look at some types of shelters that you can construct in the wilderness.
Types of survival shelters
Lean-to Shelter
This type of shelter is one of the easiest to set up. The Lean-to shelter triples as a fire reflector, wind break, and overhead.

To set up, start by placing a pole between two trees that are close to each other. You can lash the pole around the trees, or place it between branches. After setting the main pole, place more poles against it on one side to make a lean-to style frame. If you want to strengthen the poles, use vine or rope to tie them tightly. Make sure you insulate the shelter with any materials we mentioned before and use the same material to make your bed as well. On the open side of the frame, you can make a fire pit and set up a fire to keep you warm.
A-frame Shelter
This type of shelter is a modified lean-to shelter, which closes both ends of the frame. The advantage is that it gives you protection against the wind on both ends. The downside is that you can be warmed only by the fire at the opening, and you can’t lay down parallel next to it.

To make this shelter, follow the same steps for the lean-to shelter, and add few more. Construct the other side the same way you did the first one. Set the poles against the main pole, secure them with cordage, and insulate them. Build a fire at the entrance, and you’re good to go.
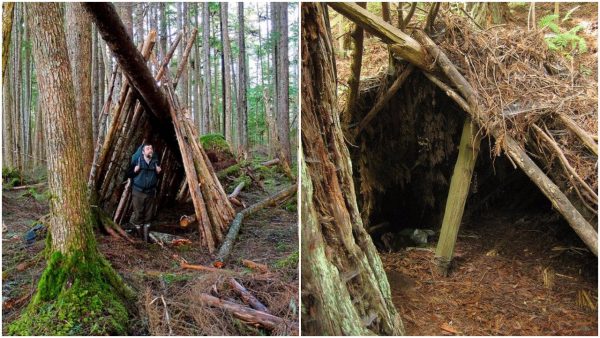
Pit Shelter
The pit shelter was very popular among the Native American tribes, who lived along the West Coast. The advantage to this type of shelter is that they offer the most warmth than any other. The downside is that to build one, you’ll need the most exertion and proper digging tools.

Start by digging a three feet pit, with a perimeter to your desire. Construct a tripod of poles over the pit, like a teepee. With a vine or a rope, tie and secure the poles at the top, and add more poles on top of them, until the shelter is closed. Don’t forget to leave a space for an opening and a vent. Get the dirt you removed from the pit, and insulate the walls of the shelter. The last thing you need to do is to make a good and cozy surface for sleeping.
Wickiup Shelter
This survival shelter is the predecessor to the tepee and is one of the strongest. It can hold strong winds and gusts, and it’s a great shelter for a long-term usage.

Get three thick poles, and tilt them together in a shape of a tripod. Secure them at the top with some vine or rope. Tilt more poles against them, until the shelter is closed, except the vent for the smoke and the entrance. Get some thick boughs from the trees around, insulate your shelter and make a comfy bedding inside. That’s it.

If you have any comments then please drop us a message on our Outdoor Revival Facebook page
If you have a good story to tell or blog let us know about it on our FB page, we’re also happy for article or review submissions, we’d love to hear from you.
We live in a beautiful world, get out there and enjoy it. Outdoor Revival – Reconnecting us all with the Outdoors.