How to Make a Fishtail Survival Bracelet
Throughout this article, I will be demonstrating how to make a fishtail style survival bracelet. Take your time as it can get a tad confusing at points.
My survival bracelets are all designed so they can be deployed easier and don’t involve melting the ends to the bracelet. That reason alone makes “ending” the bracelet a little harder than most other tutorials where they simply have you melt the end and press it into the bracelet (I hate that!). What’s the point of doing that? When you need to unravel your bracelet, your don’t want to have to rip that thing off.
KEEP IN MIND When following this guide, the numbers in the instructions coincide with the numbers in the diagram.
Step 1: What You’ll Need
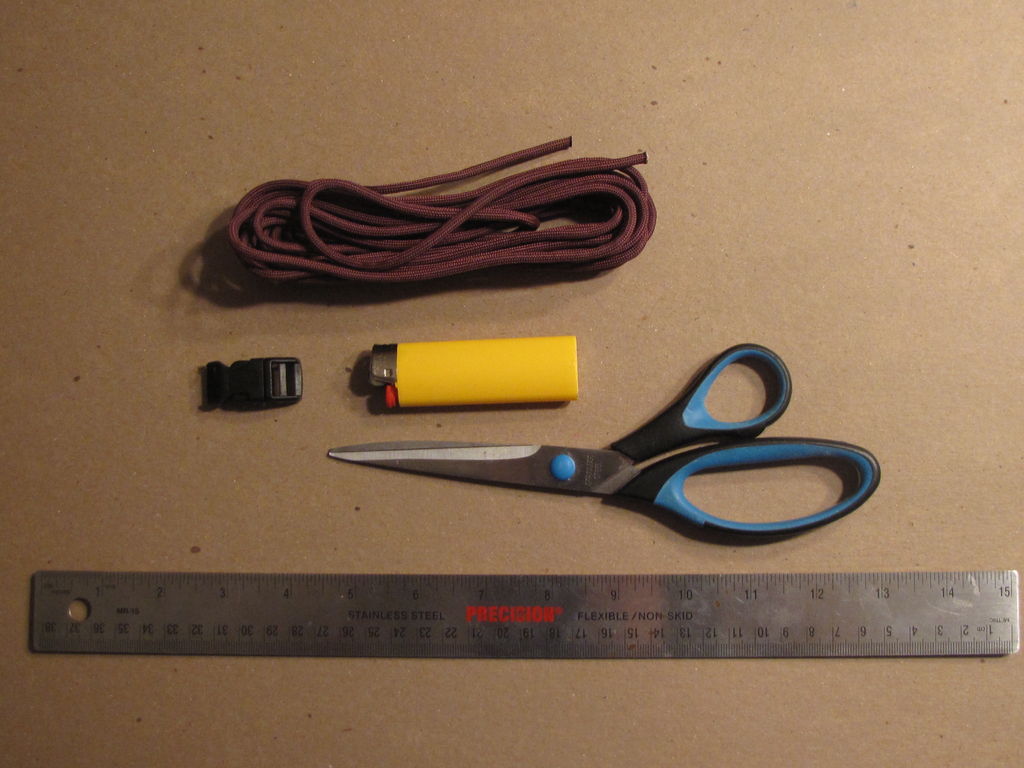
What you’ll need:
- 10 feet of 550 paracord
- Lighter
- Side release buckle
- Scissors
- Ruler/Tape measure
Step 2: Measuring Your Wrist
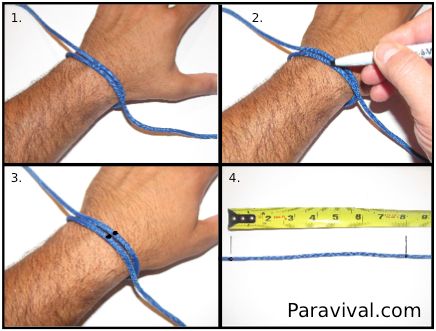
In this example my wrist measure around 8 inches. So when I go to measure for my bracelet I’m going to add 1 inch to that measurement. This will be further explained in steps to come.
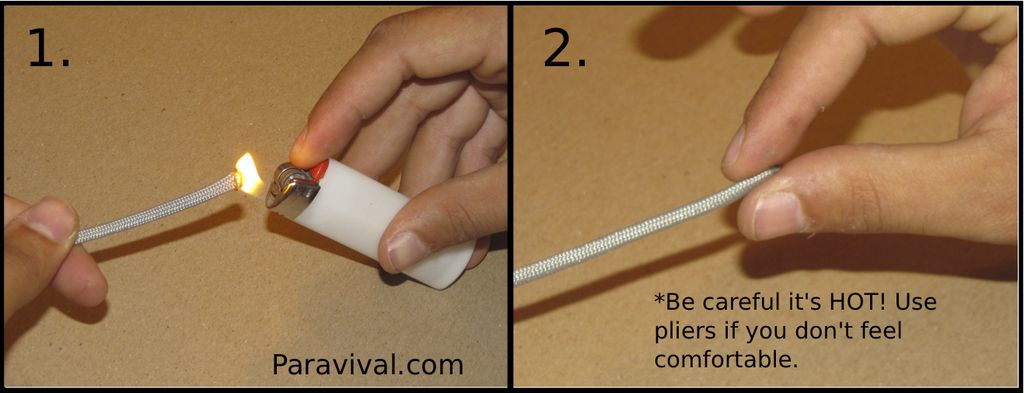
Step 3: Melting the Ends
Step 4: Completing the First Cow Hitch
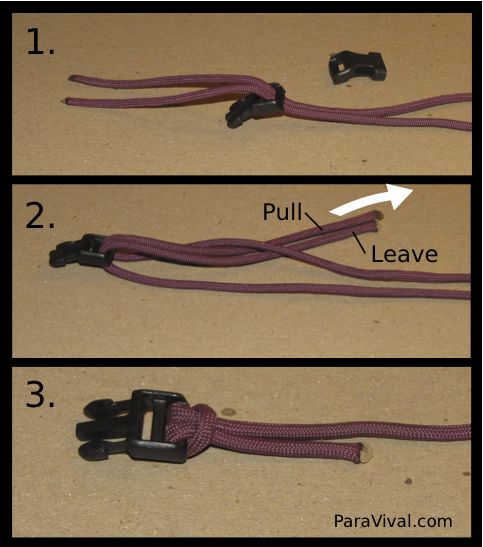
1. Fold your cord in half, so the two ends meet. Place both ends through the cord like shown in the diagram. 2. Place the two ends back through the loop created in step one and pull 1 of the cords through until the knot is tightened. 3. Adjust the cords so one cord is hanging out about 1 inch, and the other one is the rest of the cord like that shown in part 3 of the diagram.
Step 5: Making Your Second Cow Hitch and Making Your First Measurement.
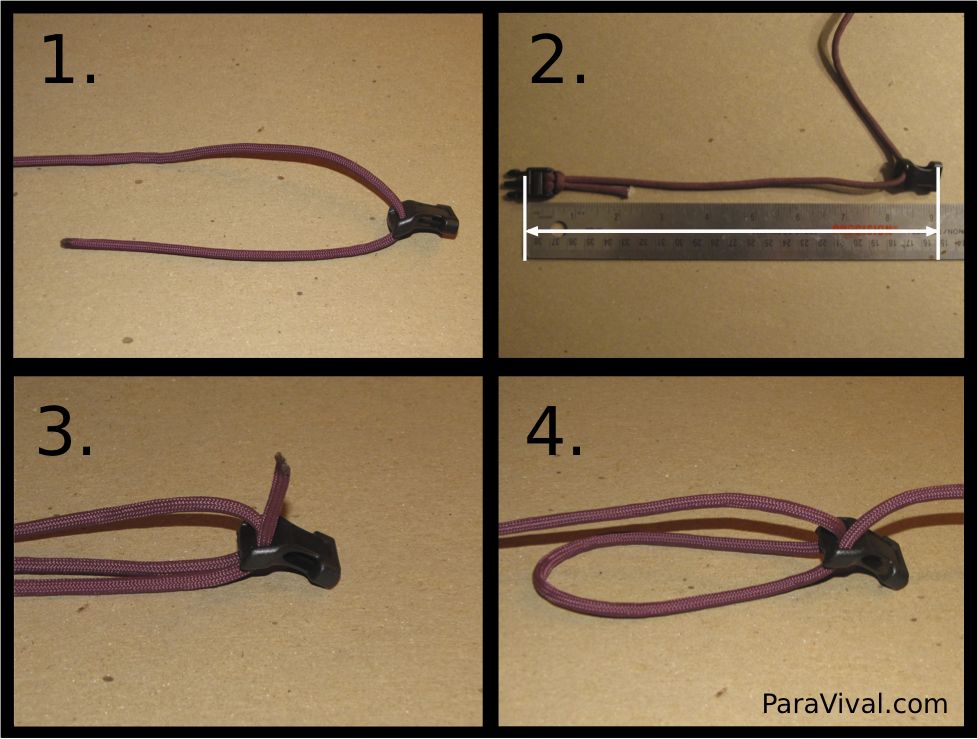
1. Take the long piece of cord you have left and place it through the female part of the buckle like shown in part 1 of the diagram. 2. In part 2 of the diagram you are going to make your first measurement. You will have to “double check” your measurement this exact way after you are done with the second cow hitch. Line your ruler/tape measure up with the middle of the male buckle and adjust your female buckle part, so it lines up with the measurement you got in step one.
Remember to add 1 inch to the measurement you got in step 1. If your wrist was 7 inches, you will want the female part of the buckle in this step to line up with 8 inches on the ruler/tape measure. My wrist was 8 inches in step 1, and in part 2 of this diagram, my measurement goes to 9 inches (it’s hard to see sorry).
3. Now take your loose cord again, and come back up through the female buckle. This is going to seem like your canceling out or pulling the cord back through the buckle. 4. Pull the cord through until you are left with a little loop like shown in part 4 of the diagram.
Please continue reading below
Step 6: Completing Your Second Cow Hitch and Re-Measuring
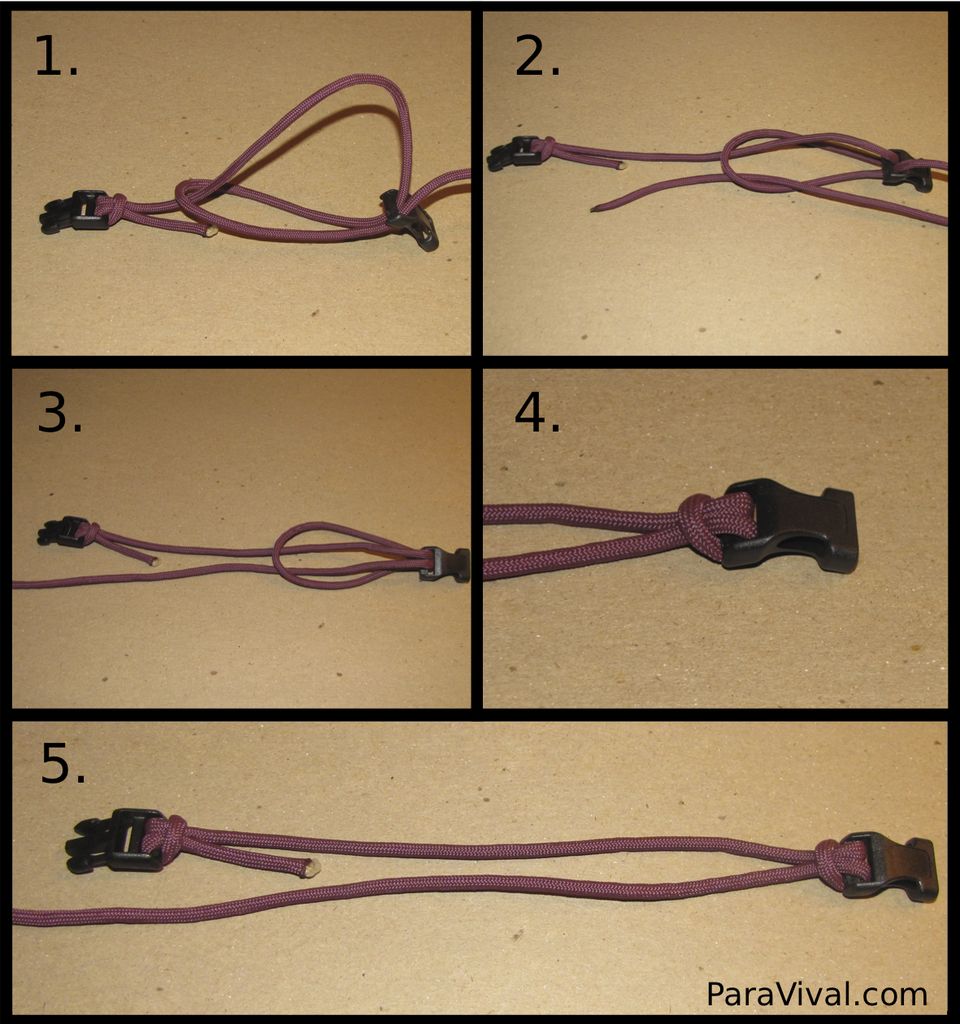
Step 7: Weaving the Loose Cord Through the First Cow Hitch
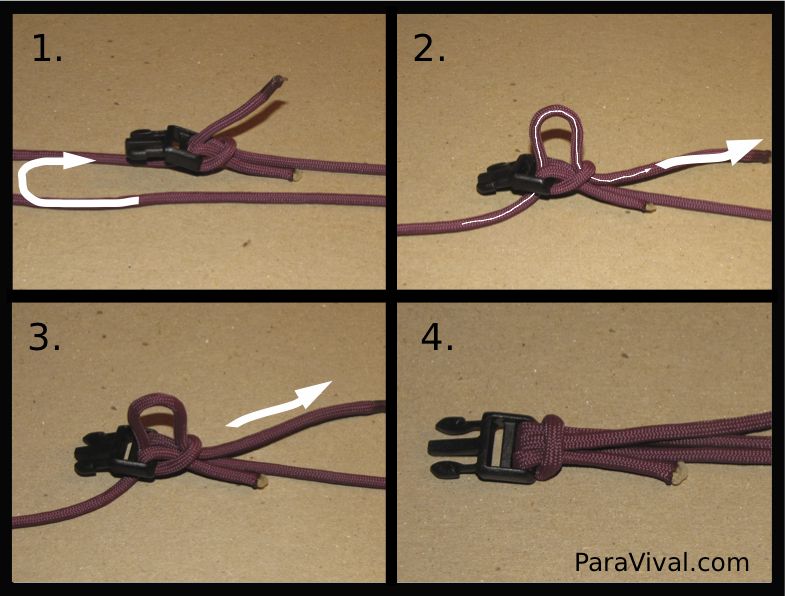
FINALLY! Now your loose end of the cord is ready to braid the bracelet itself.
Step 8: Starting Your Fishtail Braid
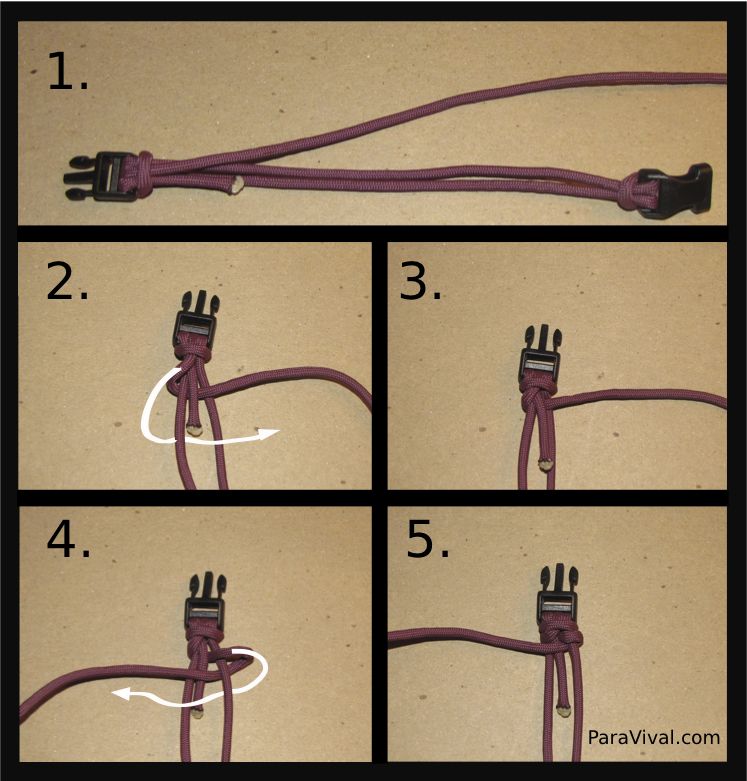
1. This is what your setup should look like. 2. Take your bracelet cord and wrap it around the back of core cord 1 and up through the middle of the two core cords. 3. Tighten your cord up and prepare for second weave. 4. Continue the loose cord around the back of core cord 2 and up back through the middle of the two core cords. 5. Tighten your braids again.
Step 9: Continuing Your Fishtail Braid
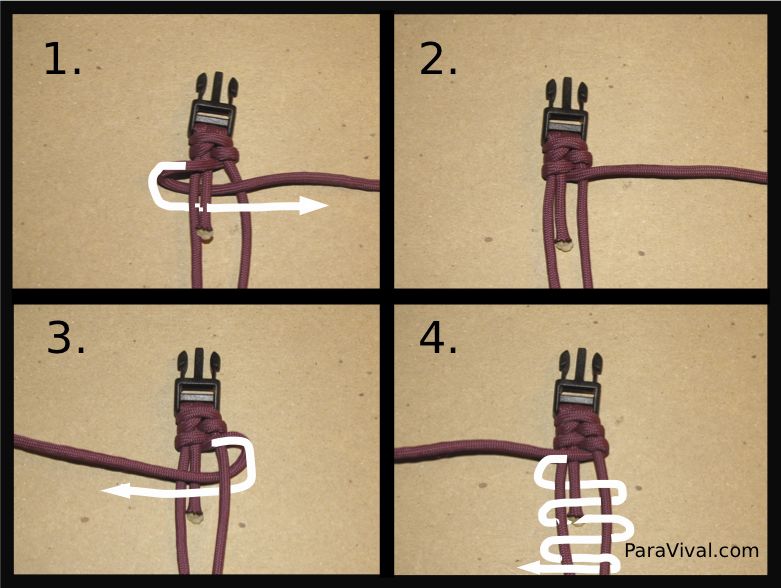
You are going to repeat step 7 now. We will demonstrate the braid one more time in this step then you’re on your own until you get down to the bottom!
1. Weave your loose cord under core cord 1 and up through the middle of the two core cords. 2. Tighten your braid. 3. Weave your loose cord under core cord 2 and up through the middle of the two core cords. 4. Tighten your braid. ALSO: Part 4 of the diagram shows you the “break down” of the weave that you are doing. It’s pretty simple. You are simply weaving in and out, in and out.
Step 10: What It Will Look Like and How to End
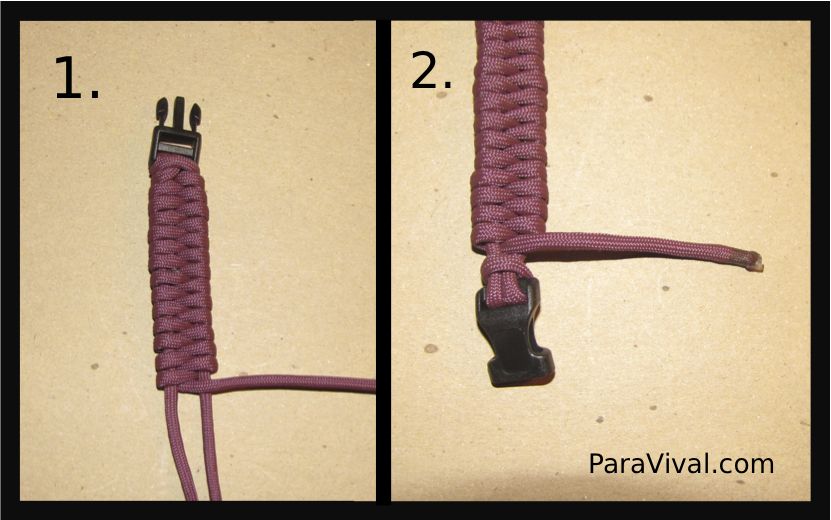
Step 11: Ending and Tying Off Your Bracelet
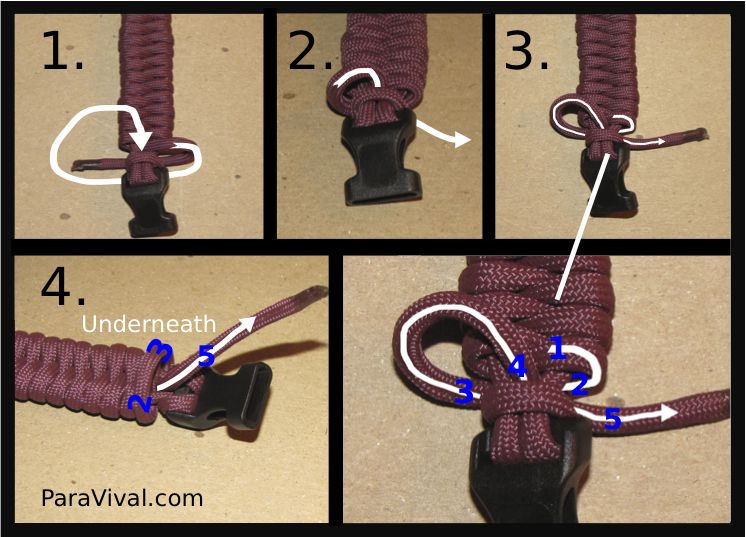
1. Take your loose cord and wrap it underneath both “core cords.” 2. Continue the loose cord through the middle of both “core cords” on the top. 3. This part of the diagram shows you what it should look like. Follow the “blown up” part of the diagram for an easy to follow image. The weave is shown by using numbers starting with 1 and ending with 5. 4. This part of the diagram shows you what the underneath side should look like. Notice the numbers 2, 3 and 5. Numbers 2 and 3 form a loop underneath on the inside of the bracelet which you will use in the following step.
Step 12: Ending and Tying Off Your Bracelet Part 2
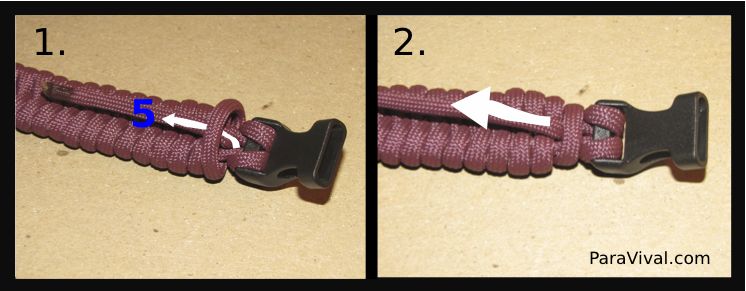
Remember to make sure it’s nice and tight before you cut the excess cord.
Step 13: Cutting and Melting the End
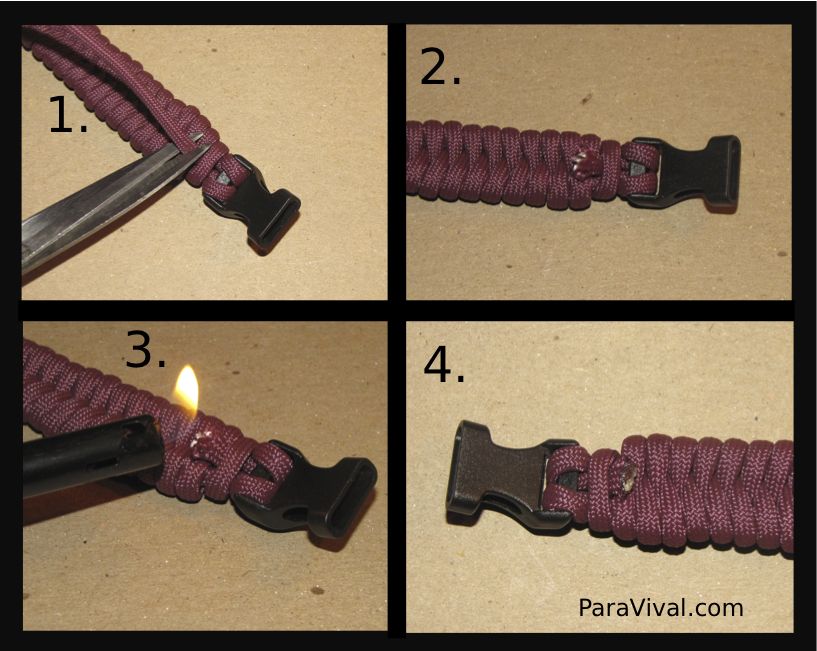
Done!
Thanks so much to Anthony for providing this article, you can see more of his creations HERE on his Dude DIY blog
If you have any comments then please drop us a message on our Outdoor Revival Facebook page
If you see a good product or have a blog you would like to share let us know about it on our FB page, we’re also happy for article and review submissions, we’d love to hear from you.
Outdoor Revival – Reconnecting us all to the Outdoors


